Why Git?
Ever written a piece of code, poem or anything on the computer and something went terribly wrong? Even if it hasn’t, the ability to revert to an older/alternate version of the same file seems like its worth the effort to learn a simple, yet powerful tool, I have made my case for using Git.
I would be lying if that was the only use for Git, but that was why I tried using it. And oh, the countless number of times it has saved days of work from being totally ruined. This is not a tutorial on how to master git, or even how to use most of the functions of git. But rather, what i wish someone had told me when i first wanted to learn Git. So, a lot of this will be personal opinions, and not recommended for a through or even accurate introduction to Git.
Is that all Git is useful for?
Version control (In Git lingo) isn’t the only reason people use git. In fact thats not even the most important feature it offers. I will not dive into the details of all its uses, but for completeness, here are some of the major functionalities that Git provides and some references for further information on these topics:
- Version Control
- Collaboration
- Distributed Management
- Easy Branching and Forking
https://www.atlassian.com/git/tutorials/what-is-git
Also a really good online tool to try out and learn about git is offered by Github itself, if you don’t want to get your hands messy
How to Git?
So now that you have come this far, lets not waste any time and get started!
In this article I will talk about:
- How to set up Git
- Creating your Repository
- Making your first commit (savepoint)
- Tracking your changes
- Discarding your untracked changes (going back to last saved point)
- Rolling back to an older savepoint (revert, reset, checkout)
- Working on other versions simultaneously (branching)
- Combining different versions (merging)
- Where to go from here
Although this may seem a lot, this barely covers some of the most important features of Git and is intended only to help you get your feet wet with Git. Also, each feature mentioned here has many many options and combinations in which they can be used which is far beyond the scope of this article. I will try to provide as many links to them as possible.
Setting up Git!
This is probably the easiest part of the process, as I had no issue getting Git up and running on any system within 5mins! I will not detail this process here as it is a well documented process on Git’s main page and is easy to follow and will most likely be up to date.
After installing Git, to test if the installation was successful and everything is working as expected, open the terminal or command prompt on your computer and run the following command
git --version
If the response is a version of Git, you are good to go!
Your first Git command!
Your first git command for any project you undertake will almost always be “git init“. But before we run this command, we must first have something to track.
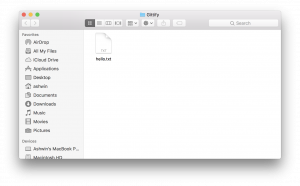
So to get started lets create a new folder with lets say the name “Gittify” where we will create a new text document called “hello.txt”
Now there are many ways to use git, with many applications abstracting the core functions that git performs. I will not lie, i too use these tools to speed up my workflow. But there is an inherent danger in using these tools without knowing what is being performed by the tool in reality.
After all, you are trusting this tool with all your important data that needs to be recovered incase of a disaster!
So for the purpose of this article, we will only use git with the command line.
Now that we have a file, lets initialise whats called a git repository in the folder “Gittify” and we will consider this the folder, whose data we want to version control. To do this, we must open our terminal/command prompt window and point it to the “Gittify” folder. This is very simple, just launch the terminal and type in “cd” followed by a space, then drag the “Gittify” folder into the terminal. The path of the “Gittify” folder should appear in the terminal. Hit Enter and you are now pointing to the “Gittify” folder from your Terminal.
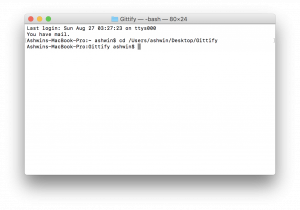
Now just enter your first Git command
git init
This will create a hidden .git folder in your project folder and you have successfully initialised your first Git Repository and run your first Git command!
Note: All changes made to the files in the repository can only be recovered as long as the .git folder is intact and not been altered
Making your first Savepoint (Commit)
I must start using Git lingo from here to save you the confusion when you refer to other articles in future. So a Commit is nothing but your savepoint/snapshot of the work that you want to track. If anything goes wrong in the process, you can always revert back to a previous commit made and all the files will be restored to the state it was in when that commit was made.
Now, although many tools allow you to directly commit a version of your repository/project, they will all internally follow the same steps as outlined in the picture below
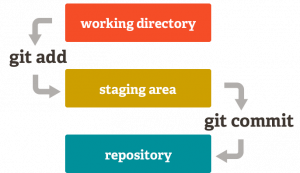
Working Directory:
All the files you are working on in the project folder (repository) in their current state
Staging Area:
Files prepared for being tracked (Any changes made to the files that are tracked will not be recorded).
This is useful for scenarios where you are happy with your work but need to try out a small change before tracking an instance of the file. If something goes wrong here, just commit the staged file, as the changes made after that were not prepared for tracking.
Repository:
Tracked files which are linked to their respective commits.
Now our “hello.txt” file is in the “working directory” and we need to track it. But first we must prepare it for tracking. We do this by running the “git add” command as follows:
git add .
the “ . ” signifies that git must move all untracked files and changes to the staging area. We can also move individual files to the staging area by replacing the ” . ” with the name of the file. Now any changes made to “hello.txt” will not be tracked unless the file is staged again.
Lets commit the file to our repository using the “git commit” command as follows:
git commit -m "initial commit"
All commits must contain a commit message to identify the commit. They need not be unique and are used to identify what change was made to the repository in that commit.
We have made our first snapshot of our file (commit). Now any further changes will not prevent us from recovering this version of the file.
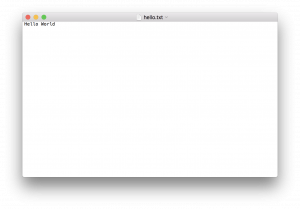
Making changes to the file
Let us now alter the file “hello.text” and add a few lines to the file. e.g. “Hello World”
Now in our terminal, if we run the command
git status
It will tell us that the file “hello.txt” has been modified. We now need to take a snapshot of the version of the file as it now contains the latest version of our file.
To do so we perform the same steps of “git add .” followed by “git commit”
git add .
git commit -m "Hello world added"
Now our repository contains the latest version of our file!
Oops! Made a mistake? (discarding changes)
Now that we have our file committed, lets say we make some changes that we do not want. Instead we want to go back to the state that the repository was in its last commit.
To do this now lets modify our “hello.txt” file and add some more text and save it. 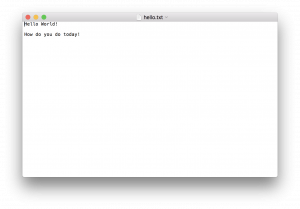
In a normal scenario, this would be a catastrophe as you do not have any means to recover the older version of this file, but with git, this is almost too easy. Now if we want to discard these changes and go back to our original version, all we need to do is run the command
git checkout -- .
The “checkout” command is used to, as the name suggests, checkout a particular snapshot version (commit) of the file. But since the version we need is that latest commit, we use the period. The double dash (–) in between is used to remove ambiguity and is completely optional in this exact scenario.
Now if we open our file we will see that it contains just the text “Hello World”
Note: If we had staged this change, we must first reset the staging using
git reset HEAD -- .
Where again the — is to remove the ambiguity in the branch name and the period signifies all files.
Before proceeding to the next section, lets add some more text to our file an commit it to actually see the power of git. E.g. Lets replace the text in the file with “My second change! Awesome!” and commit this new change with a new message
git add .
git commit -m "my second commit"
What about the previous commits?
(revert, reset, checkout)
What if we need to go back to an older version of the file? Well, this is easy too!
Git provides 3 ways that we can do this, and before we understand these ways, lets just take a quick look at how Git’s version control works.
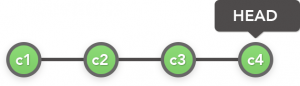
Lets take the image above to represent our repository. Each commit is represented by a name (c1, c2, c3, c4) and they track the changes made to the files between the commits. Git by default shows the latest commit in this chain, i.e. c4 and this is denoted by where the HEAD points to. If we now instead point the HEAD of our repository to another commit in this chain, we will have “checked out” that version of the file.
As we are trying go back to an older version of our file, lets see how the three different approaches of git achieve this work. Each one has its own benefit’s. Let’s go over each of them:
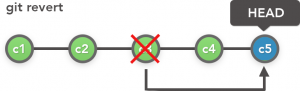
git revert
Here the we mention a commit we want to revert to, and git makes a new commit (c5) with the version of the file/repository from the commit we mentioned. This is advised for shared repositories as no commit is erased from history in the process of reversing changes.
To do this for our repository, lets use the following command
git revert HEAD~0
“HEAD~0” will revert the repository to a commit a single step behind from the HEAD of the repository (Larger steps in to the commit history can be reached by changing the number 0).
This action might raise a conflict. This is because Git sees that an older version has different data in the file as compared to the latest version and is unsure of which version of the file is the correct one and needs you to manually step in and tell it the correct version. This is known as a merge conflict, and there are many brilliant articles on how to resolve them (https://help.github.com/articles/resolving-a-merge-conflict-using-the-command-line/).
But for our purposes, this should result in a commit message window opening (Incase earlier when committing, if the -m flag followed by the message was not entered, this window would have appeared then too). Here we will see the revert commit message that will be stored. You may change it if you want but we can move on and save this message and commit our revert by typing the following commands in sequence
# CTRL + X
# CTRL + C

# and then type
:wq
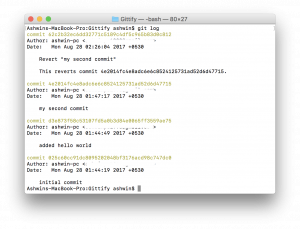
With this we have successfully reverted our file to an older version and our file should read “Hello World”
If we run the command “git log”, we should now see something similar to this:
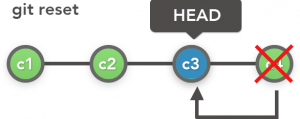
git reset
This is a more permanent method to revert back to an older version. This can be used in Unshared repositories as it will delete commits and anyone else referring to these commits will not be able to do so after this action.
In our example we have already reverted the file in the previous step. This created a new commit with the changes from the commit titled “added hello world” as shown in the previous section. Now lets reset the last commit that the revert command created and restore our file to “My second change! Awesome!”.
To do this we must run the following command
# The index for reset starts from 1 unlike revert which starts from 0
git reset HEAD~1
This will reset the head to the previous commit and delete all commits after it. You will notice one thing here that your file has not changed in this scenario. This is because the default git reset function only alters the repository but does not modify the working directory. If we discard all the unstaged changes, we will get the reset commit that we intended (Using git checkout as mentioned earlier)
To avoid this step we can just run the same reset command with the “–hard” flag which resets the repository as well as the files in the directory.
# Change the files too
git reset --hard HEAD~1
Now our file should read “My second change! Awesome!” again. Yay we successfully reset our commit to an older version.
git checkout
This is a third method by which we can reset the file to an older version and as mentioned earlier just moves the head of the repository to another commit. This should be avoided at all costs as this causes the HEAD of the repository to detach from the latest commit location where it must point to.
For the above three methods of reverting the repository, Atlassian has an amazing article outlining in detail these functions. (https://www.atlassian.com/git/tutorials/resetting-checking-out-and-reverting)
Working on other iterations
Now while in a perfect world, the functions mentioned above might be enough to get our work moving, it alone isn’t sufficient enough to handle all our version control requirements. What if we need to work on another iteration of our project but not lose our current version. Well we could in theory just control these via commits. But this linear model may soon prove to be confucing as we will need to keep track of which version is the one we need and how to simultaneously handle two or three iterations.
To solve this problem, Git was built around the branching model, where each new feature or iteration will involve branching your repository from the main one and working on it independently with its own set of commits. With this we can easily switch between different iterations/branches.
So lets try this out! First we need to create a new branch and switch over to it. We can do so by using the following commands:
# Creates new branch called "my-first-branch"
git branch my-first-branch

# Switch over to the newly created branch
git checkout my-new-branch

# Shorthand for performing the above two steps simultaniously
git checkout -b my-new-branch
Now that we are in our new branch, we can see that our files are the same as that of the latest version of our original repository branch. A very good tutorial on git branches is available on https://www.atlassian.com/git/tutorials/using-branches. To learn more about branches, please refer to that article. But for the purposes of this article, we will use this branch to maintain an iteration of our repository.
Note: The root branch of any git repository is always called “master”
Now lets make come changes to the file in this iteration and replace the text to “Some generic text from the new branch” and commit this new change
# Add the text "Some generic text from the new branch" to hello.txt and then
git add .
git commit -m "changed in branch"
Lets now switch back to our master branch and see the state of our file there
# switch over to the master branch
git checkout master
We will see here that the file has changed back to “My second change! Awesome!” from “Some generic text from the new branch”. We can have multiple such branches and quickly switch between them to work on different iterations of our project.
Combining the iteration into the main copy
While having iterations may be good, eventually we need to bring over those changes into the main copy. This can be done by using the “git merge” functionality. git allows you to merge the changes between any two branches. This, as we will is a pretty vast topic, so i will only cover the basics of merging here. For more information, look at https://www.atlassian.com/git/tutorials/git-merge.
From our previous section we have a newly created branch named “my-new-branch”. Lets merge this iteration into our master branch. We can do this by using the command:
# Ensure that we are in the master branch
# (This is only for this example as git merge command merges into the active branch)
git checkout master

# Merge the new branch into the current branch(master in this case)
git merge my-new-branch
We can now see that the file in our master branch contains the text from our “my-new-branch”. This is because we changed the text in our file in our branch and while merging, Git noticed these changes and applied the same to our master branch
If we are done with our iteration, we can also subsequently delete the branch using
git branch -d my-new-branch
Note: In some cases, we may encounter a “merge conflict”. This is when git is unsure on how to merge the changes in the files. This can however easily be resolved, refer to this simple article on how to resolve conflicts: https://help.github.com/articles/resolving-a-merge-conflict-using-the-command-line/
Where to go from here?
Now that we have covered some essentials of how to use Git, I strongly advise you to learn more about each of these commands and their various options. Github, Atlassian, and git-scm all provide beautiful and in-depth tutorials on all of Git’s features.
Also this has talked about how to use git using the command line. However this can sometimes turnout to be cumbersome and there are many GUI’s available that abstract these features into a pleasant looking application such as Github’s “Github for Desktop”. However, no client is perfect and they all have their shortcomings, which is why I recommend that you know git at its core before depending on a GUI.
Git itself is fairly complex to understand, So it is fairly important to use a workflow that suits your needs to maintain a rational flow of work. With the right workflow and the core knowledge of git, your\r productivity will know new bounds.
Some other important git commands
- git status: Shows the status of the working repository
- git log: Shows the commit logs
In Conclusion
When I first started learning Git. All the tutorials out there were too complex and detailed, it made my journey into learning Git a very scary experience. I hope that this article made breaking into Git a little bit easier. It is a very powerful tool, which means it can get very complicated if you are not aware of what you are doing.