This article is part one of a two part article series on how to get your first web app up and running online for the world to see!!
In part one we will look at how to first build the app that we want to publish online, and in part two we will look at the various ways we can get this article online and how to actually do it and share it with the world. If you already know how to build apps and only have a need for how to get them online, skip part one and directly refer to the next article. So lets get started. This is the app we will be building…
See the Pen Material Design Calculator by Ashwin P Chandran (@Werty7098) on CodePen.dark
We will be building the very simple calculator app as seen above. These are the steps involved:
- Create Files
- Create Basic HTML Markup
- Style it with a lil CSS
- Add functionality to it with Javascript
- Go to part 2 to get the app live online for the world to see
Step 1: Create Files
So to create files lets first create a folder named “calc” on our desktop. In it we will create 3 files needed to get our app to work. They are:
- index.html – To hold together our markup or app structure
- style.css – To maintain all styling rules
- calc.js – To program our app functionality
Now only index.html has to be named exactly the same as this is what our solution to go online will look for as the starting point, the other two maybe names any other name but for the purpose of simplicity, lets stick to the naming convention.
Now the entire process will be much easier if you have a text editing app such as Atom or Sublime Text, but nevertheless if you are stuck with text edit, follow the steps below to create the files.
On Windows:
1. Right click anywhere inside the empty folder, and click on the “New” option. 2. Under this option, click the “Text Document” option but rename it to match our filenames and extensions.
On the Mac, its slightly harder as it does not provide such a straightforward way to create a new file.
1. Open Text Edit and click “New Document”
2. Save the document in the “calc” folder with correct filename and extension as mentioned above

Step 2: Make the structure (HTML)
Now lets work on our first file. Open index.html with any text editor such as notepad, atom, visual studio code, sublime text, etc. Here we will start to write our first code!
Now HTML is a markup language. It is used to define how the structure of the page should be. It uses tags to differentiate between the apps various components. Below is a basic layout of a HTML5 page. Type/Copy the code below into the index.html file.
<!DOCTYPE html>
<html>
<head>
    <meta charset="UTF-8">
    <title>Document</title>
</head>
<body>

</body>
</html>
Now lets breakdown the above code:
- The first line is used to indicate to the browser that the file is of HTML5 specifications.
- The <head> tag is not rendered on the screen. It is used to store the pages metadata and load various external files for the page.
- The <body> tag will contain all the components to be rendered on the page.
- Both the body and head tag must always be enclosed by a <html> tag and all tags must either be closed with a closing tag such as </html> with the / symbol, or be self closing like in the case of the input tag.
For more information on HTML look at the references at the end of this article.
Now lets populate the index.html file with content:
<!DOCTYPE html>
<html lang="en">
<head>
    <meta charset="UTF-8">
    <meta name="viewport" content="width=device-width, user-scalable=no, initial-scale=1.0, maximum-scale=1.0, minimum-scale=1.0">
    <title>Calculator</title>
    <link rel="stylesheet" type="" href="style.css">
</head>
<body>
    <div id="calculator">
        <div id="screen">
            <div id="expression"></div>
            <div id="answer"></div>
        </div>
        <div class="number-container">
            <div class="button" onclick="insertDigit('7')">7</div>
            <div class="button" onclick="insertDigit('8')">8</div>
            <div class="button" onclick="insertDigit('9')">9</div>
            <div class="button" onclick="insertDigit('4')">4</div>
            <div class="button" onclick="insertDigit('5')">5</div>
            <div class="button" onclick="insertDigit('6')">6</div>
            <div class="button" onclick="insertDigit('1')">1</div>
            <div class="button" onclick="insertDigit('2')">2</div>
            <div class="button" onclick="insertDigit('3')">3</div>
            <div class="button" onclick="insertDigit('.')">.</div>
            <div class="button" onclick="insertDigit('0')">0</div>
            <div class="button" onclick="calc()">=</div>
        </div>
        <div class="operation-container">
            <div class="button" onclick="clearScreen()">DEL</div>
            <div class="button" onclick="insertOperation('+')">+</div>
            <div class="button" onclick="insertOperation('-')">-</div>
            <div class="button" onclick="insertOperation('*')">x</div>
            <div class="button" onclick="insertOperation('/')">÷</div>
        </div>
    </div>

    <script src="calc.js"></script>
</body>
</html>
Now we have added the structural components to realise our calculator app. Lets breakdown what we have added to our index.html file:
- <meta name=”viewport” …. is used to make the app compatible with mobile devices as they have a different measurement for the width of the device.
- The <title> tag defines what text will appear on the tab when the page is opened.
- The <link> tag is used to load our stylesheet the style.css file. This is done for better code separation and though the styles can be placed in the same document, best practices are to keep them separately to ensure better code readability.
- The <div> tag is type of tag used to define containers in HTML. They are used here to define the various buttons and components that will make up the calculator.
- All tags can have certain attributes that give it certain properties. In the attributes we use here for the div tags are class , id and onclick .
- The class attribute groups similar elements by the same class name e.g.”button”.
- The id attribute is used to give a unique id to the element e.g.”calculator”.
- The onclick attribute is used to define which function is called when the element is clicked. We will see this function later in on.
- we use the <script> tag to load the third file into our page, calc.js
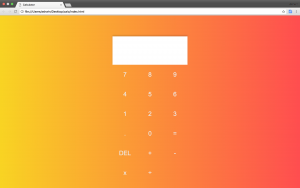
If this much is there in the file index.html we should see the following if we open the file in a web browser.

Hurray! we have completed the second step in the building of the app. Now we ca proceed to style the calculator components.
Step 3: Styling the app (CSS)
Now lets open the second file that we had created, style.css. CSS is a language that describes the style of an HTML document. All CSS files end with the extension .css
Into style.css lets add some styling syntax. This syntax will only cover the properties needed to achieve the look of the calculator app shown above, and for further references in the various style properties and techniques refer to the links at the end of the article.
First lets add some base style rules to the body, html and universal selector.
* {
    box-sizing: border-box;
}

html {
    height: 100%;
}

body {
    height: 100%;
    margin: 0px;
    background: #FF4E50; /* fallback for old browsers */
    background: -webkit-linear-gradient(to left, #FF4E50 , #F9D423); /* Chrome 10-25, Safari 5.1-6 */
    background: linear-gradient(to left, #FF4E50 , #F9D423); /* W3C, IE 10+/ Edge, Firefox 16+, Chrome 26+, Opera 12+, Safari 7+ */
}
If you refresh the page, you will only see the background change color to a smooth orange gradient. The background property is responsible for that. The * also known as the universal selector is defining how the box size of the elements should be calculated based on the box model.
To make our calculator look more real, lets add some id specific and class specific styles. If you remember in Step 2, we had grouped similar elements with a class name and given certain elements id’s
#calculator {
    width: 100%;
    max-width:360px;
    margin: auto;
    margin-top: 100px;
    font-family: Arial, Helvetica, sans-serif;
    box-shadow: 0px -5px 9px 0 rgba(0, 0, 0, 0.17);
}
This defines that the calculator element will be selected and the following styles will be added.
- width equal to 100% the with of the parent container. In this case the body element, but only until a maximum width of 360px.
- the margin properties are used to center align the calculator element and push it down 100 pixels from the top of the screen to give it a floating effect.
- the font-family is used define the fonts used, the fonts are rendered in priority from left to right with the next being used if one is not available.
- the box-shadow property is used to give the element a shadow so that it appears raised
Now lets style the screen element and the button class
#screen {
    min-height: 136px;
    padding: 30px 20px;
    text-align: right;
    font-size: 30pt;
    color: #3a3939;
    background-color: white;
}

.button {
    display: inline-block;
    width: 33.3%;
    padding: 30px;
    font-size: 22pt;
    text-align: center;
    color: #ededed;
    background-color: transparent;
    float: left;
    cursor: pointer;
}
Lets look at the styles used in the screen element:
- min-height specifies the minimum height the screen should be of. This was determined so that even when there are no numbers on the screen, the screen element doesn’t collapse.
- padding, text-align, font-size, color, background-color are all similar properties that define how a screen of the calculator should behave.
Now the buttons:
- display: inline-block is needed as div elements are by default of type block, and block elements occupy the entire row, therefore to accomodate multiple buttons per row, we have to display it as an inline block element
- we define its width as 33% of its parent container as there must be only 3 digits per row, the 4th operand digit is part of a different parent container.
- float: left is a CSS hack needed as div elements add a small margin between themselves without this property and we cant get the look we want.
- cursor: pointer is needed to define the div element as a clickable object and change the look of the cursor to that of a pointer.
By the end of this we should be able see the following screen.
Now our app is starting to take shape. Lets add the remaining styles that make it take shape.
The screen is made of two parts, the expression to evaluate and the instantaneous result section. Lets style these two parts,
#screen #expression {
    overflow: hidden;
    text-overflow: ellipsis;
}

#screen #answer {
    font-size: 20pt;
    color: #ababab;
}
here we are just ensuring that any overflow of the text in the expression section is taken care of and the color and font size of the answer section is altered to match the design.
.button:hover {
    background-color: #404040 !important;
}
This defines that happens when we hover over a button class element. In this case, we change the buttons background color and make it slightly darker.
/* --- Number and Operation Container styles --- */
.number-container {
    display:inline-block;
    width: 75%;
    background-color: #434343;
}
.number-container::after {
    content: " ";
    display: block;
    clear: both;
}
.operation-container {
    padding-top: 1px;
    display: inline-block;
    width: 25%;
    float: right;
    background-color: #636363;
}
.operation-container .button {
    width: 100%;
    padding: 27px 0px;
    font-size: 13pt;
    background-color: #636363;
}
These set of styles define how buttons should be contained within them.
- The number-container gives itself 75% of the width of the calculator and displays itself inline with the other container
- The operation-container gives itself the remaining 25% of the calculators width and also displays itself inline. The background-color, padding-top and float properties are to fix certain styling issues the app had faced with alignment and beyond the scope of this article.
- ::after is a pseudo element that is used to overcome a style issue where the parent element collapses when the child elements are floated.
- Finally, the buttons in the operation-container have to be styled slightly differently.
Finally we add a rule to remove the top margin in the calculator on devices with smaller screens
@media only screen and (max-width : 400px) {
    #calculator {
        margin-top: 0px;
    }
}
This defines that upto a maximum width of 400px, there will be no top margin for the calculator.
Totally our style.css file should resemble as follows
* {
    box-sizing: border-box;
}

html {
    height: 100%;
}

body {
    height: 100%;
    margin: 0px;
    background: #FF4E50; /* fallback for old browsers */
    background: -webkit-linear-gradient(to left, #FF4E50 , #F9D423); /* Chrome 10-25, Safari 5.1-6 */
    background: linear-gradient(to left, #FF4E50 , #F9D423); /* W3C, IE 10+/ Edge, Firefox 16+, Chrome 26+, Opera 12+, Safari 7+ */
}

#calculator {
    width: 100%;
    max-width:360px;
    margin: auto;
    margin-top: 100px;
    font-family: Arial, Helvetica, sans-serif;
    box-shadow: 0px -5px 9px 0 rgba(0, 0, 0, 0.17);
}

/* --- Calc Screen Styles --- */
#screen {
    min-height: 136px;
    padding: 30px 20px;
    text-align: right;
    font-size: 30pt;
    color: #3a3939;
    background-color: white;
}

#screen #expression {
    overflow: hidden;
    text-overflow: ellipsis;
}

#screen #answer {
    font-size: 20pt;
    color: #ababab;
}

/* --- Calc Button Styles --- */
.button {
    display: inline-block;
    width: 33.3%;
    padding: 30px;
    font-size: 22pt;
    text-align: center;
    color: #ededed;
    background-color: transparent;
    float: left;
    cursor: pointer;
}
.button:hover {
    background-color: #404040 !important;
}

/* --- Number and Operation Container styles --- */
.number-container {
    display:inline-block;
    width: 75%;
    background-color: #434343;
}
.number-container::after {
    content: " ";
    display: block;
    clear: both;
}
.operation-container {
    padding-top: 1px;
    display: inline-block;
    width: 25%;
    float: right;
    background-color: #636363;
}
.operation-container .button {
    width: 100%;
    padding: 27px 0px;
    font-size: 13pt;
    background-color: #636363;
}

@media only screen and (max-width : 400px) {
    #calculator {
        margin-top: 0px;
    }
}
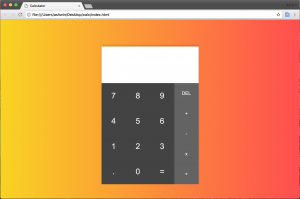
and the page should look as follows
And now to our final step in the app. Giving it functionality!!
Step 4: Giving it functionality! (Javascript)
Now that we have made our page display a calculator, lets make it also behave like one! for that we will need to open our last file calc.js
This is the file where will describe how our onclick functions will work. First in the file we will have to describe certain values that we will need for our functions.
var num = '';
var expString = document.getElementById("expression");
var answer = document.getElementById("answer");
- num will keep track of the expression to evaluate
- expString is a reference to the expression element in the HTML
- answer is a reference to the answer element in the HTML
Now lets write the function where we insert a digit or the insertDigit function defined in our HTML
function insertDigit(digit) {
    num = (answer.innerHTML === '') ? digit : num + digit;
    expString.innerHTML = prettify(num);
    answer.innerHTML = eval(num);
}
num will be equal to the digit if the text inside the answer element is empty. Else the digit will be concatenated with the previous num value. This is to ensure that when the answer element is empty, a new calculation begins, else the old calculation continues.
The expression element will display a prettified version of the expression and the answer element will display the evaluated version of the expression. (Note: eval() is a default javascript function to evaluate a mathematical expression e.g. “3 + 4 * 5”)
Next the insertOperation function or the function to call when an operand such as +/- is clicked.
function insertOperation(digit) {
    answer.innerHTML = (answer.innerHTML === '') ? num : answer.innerHTML;
    num += digit;
    expString.innerHTML = prettify(num);
}
here the value of answer depends on whether it is already empty or not. If it is, its value will be equal to num, else its value will be itself. This is because when the answer element is empty and an operand is pressed, it signifies that the previous operation should continue and so repopulate its contents with the previous value.
The num adds the operand to its expression and the expression element displays a prettified version of it.
The calc function is in comparison much simpler.
function calc() {
    num = answer.innerHTML;
    answer.innerHTML = '';
    expString.innerHTML = prettify(num);
}
it just moves the value from the answer element to the expression element to either continue or start a new calculation, and clears the answer element.
function clearScreen() {
    num = '';
    expString.innerHTML = num;
    answer.innerHTML = num;
}
The clearScreen function just resets all values and screen elements text.
// convert * and / signs to x and ÷
function prettify(string) {
    string = string.replace("*", "x");
    string = string.replace("/", "÷");
    return string;
}
finally the prettify function is used to replace * and /, the symbols used by computers to multiply and divide respectively with the symbols we are more accustomed to using such as x and ÷.
Now our calc.js file should look as follows:
var num = '';
var expString = document.getElementById("expression");
var answer = document.getElementById("answer");

function insertDigit(digit) {
    num = (answer.innerHTML === '') ? digit : num + digit;
    expString.innerHTML = prettify(num);
    answer.innerHTML = eval(num);
}

function insertOperation(digit) {
    answer.innerHTML = (answer.innerHTML === '') ? num : answer.innerHTML;
    num += digit;
    expString.innerHTML = prettify(num);
}

function calc() {
    num = answer.innerHTML;
    answer.innerHTML = '';
    expString.innerHTML = prettify(num);
}

function clearScreen() {
    num = '';
    expString.innerHTML = num;
    answer.innerHTML = num;
}

// convert * and / signs to x and ÷
function prettify(string) {
    string = string.replace("*", "x");
    string = string.replace("/", "÷");
    return string;
}
And thats it! Now if you open index.html in a web browser, you will have a fully functional calculator app as the one displayed in the beginning of the article.
Conclusion
We have seen in this article, how to build a beautiful calculator app based on the Android Nougat default calculator app. We built it using 3 files, with 3 different purposes. Now that we have this beautiful app, the only thing remaining is to share it…..
In Part 2 we will look at the different avenues we can use to share our app with the world for FREE, so that we can show the rest of the world our beautiful creations!
Stay tuned for Part 2